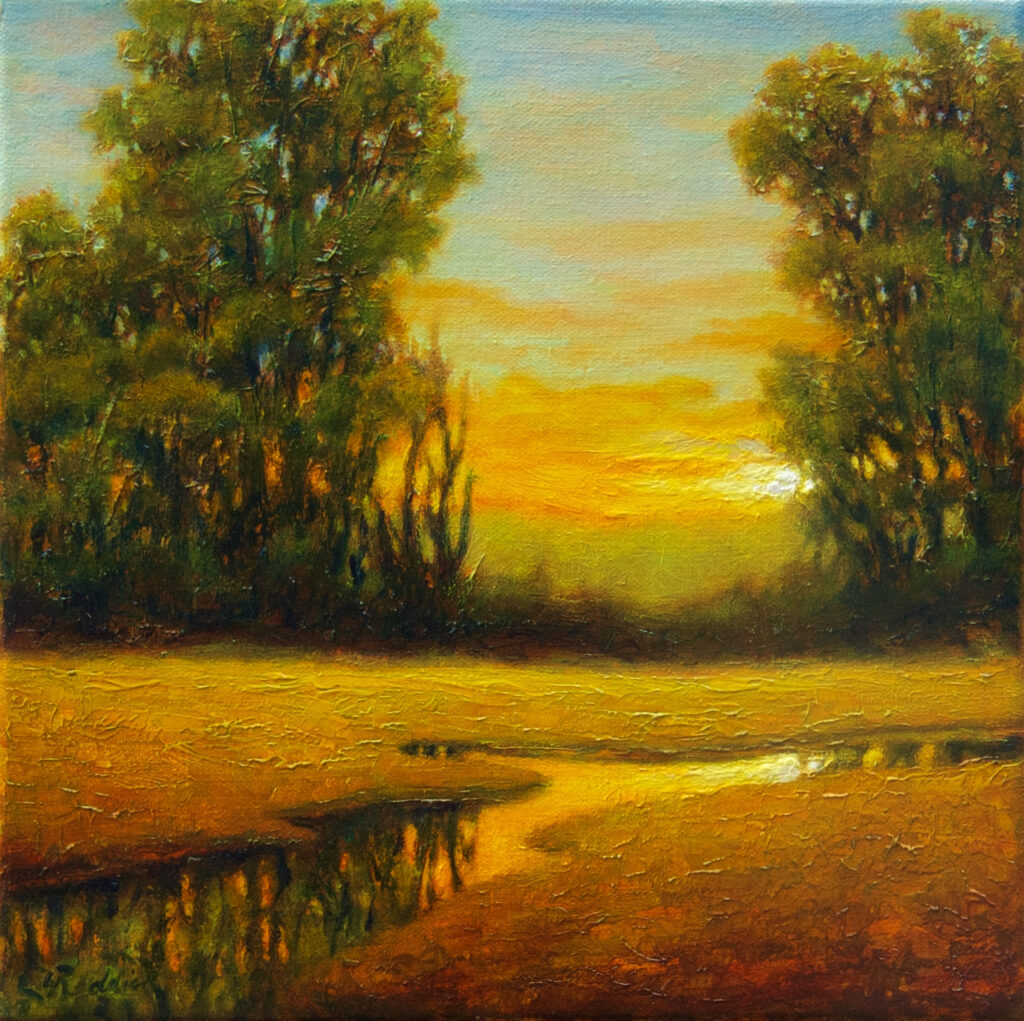
This post is to hopefully help out all of you who had been following along with Painting Like The Old Masters Parts 1 and 2. I want to reach out to everyone and am extremely sorry for the mix up! A local TV station invited me to do this series. I put a lot of work into it and we taped all 3 parts. Unfortunately the station downsized dramatically and apparently have virtually no staff left. I have been inquiring but no response and they still have not put Part 3 to air. It is not okay that people who are following along are not able to access the final episode. Here I have attached the photo of the completed piece and put together some point form notes and am hoping these will make sense and be useful to help you complete your paintings.
_____________________________________________________________
I am excited to share with you more of the layering methods that people like Rembrandt, Caravaggio, Da Vince, Titian, Vermeer used. The Old Masters studied and researched and worked hard to develop these amazing techniques.
In Part 1 we began with a blank canvas and painted a monochromatic underpainting.
We let that dry and then in Part 2 we glazed over the whole piece again and working wet into wet, began establishing some lovely colours.
For the third sitting we will add more layers of colour and build up both contrast and depth.
We start with the sky and paint over the whole sky and the stream, with a glaze made by mixing approximately one part Indian Yellow with one part oil painting medium. (The medium I am using is Liquin by Windsor & Newton)
Indian Yellow is a transparent, single pigment colour and I’ve mixed it approximately one to one with medium to add even more to the transparency.
As always with this method of painting, we work from brightest toward darkest, so we can start painting white into the brightest areas of the sky and into the reflection of those highlights in the stream. Paint wet into wet, allowing the white to gradually pick up more of the Indian Yellow glaze so that the first strokes are the brightest and then the white fades gradually.
Next I add some very soft blues to the sky. I used Cerulean Blue mixed with White to create a few tints, and also with approximately half medium. This is in the same ratio as a glaze but the mix contains white which is opaque, so rather than a glaze it’s referred to as a veil. (or a velatura) We want this to be semi-transparent to allow some of the yellow glow from the sun to shine through. Although you need to be careful not to pick up too much glaze on your brush or your sky could become a bit too green. As you paint the sky, you can gradually fade up to slightly deeper blue because as you know, the sky is lightest at the horizon and then deepens gradually as you look up.
Paint these tints of blue into the sky holes as well, keeping in mind they are in shadow so are slightly darker than the corresponding area of sky.
Use Azo Green mixed with just a few drops of medium, to paint the back part of the meadow and the foliage of the trees as well as the reflections of the foliage in the stream.
You’ll notice I don’t mix colours on the palette. And the paints I’m using are single pigment colours, meaning the manufacturer hasn’t mixed colours either. As soon as you begin to mix more than one pigment you begin to move toward muddier colours. The Old Masters knew that it all has to do with the way the light reflects and bounces back to your eye from the canvas. This is why I like to layer pure pigments to achieve the desired colours. That is a big part of achieving what seems to be a glow from within your paintings. This method allows the light to bounce from one pure pigment to another and back to your eye, keeping the colour bright and luminous. The impressionists also understood this and rather than layering, they sometimes placed single pigments close enough that your eye would blend them, creating magnificent works.
Use Cadmium Yellow Light mixed with a drop of medium for the highlights at the back of the meadow. Also paint this Cad Yellow Light into the bank of trees in the far background.
Strengthen the contrast in the trunks and branches of the trees using Ultramarine Blue mixed with medium. Also use this blue to paint the reflections in the stream.
You can paint the foreground of the meadow with more Transparent Red Iron Oxide.
Once the glaze begins to dry a bit, you can bring more azo green into the mid area of the meadow if needed as well.
Go back and soften and or re-establish the sky holes if needed.
I often do additional sittings before a painting is complete…sometimes adding many layers.
But this one was finished in the three sittings.
The final touch is to punch up the brightest highlights of the piece in the sky and reflected in the stream, by applying nice thick ‘impasto’ brush strokes of white paint.
Again, my sincere apologies that we are not able to access the video for Part Three. Hopefully this is of some help!
Yvonne Reddick
Yvonne Reddick Art Studio

